If you are no longer using a Facebook Page, or closing your business, or want to rebrand your company, then you may be wondering how to delete a Facebook Page permanently.
Though users can delete a Facebook Page, the process can be confusing as the platform regularly updates its settings and management tools.
Many users struggle to find the right option while deleting a Facebook Page or are not sure whether they should delete, deactivate, or unpublish their Page.
This detailed blog explains how to delete a Facebook Page permanently using both desktop and mobile devices. Users will get to know the steps to delete a Facebook Page, understand the users who have the permission to remove a Page, and know what happens after you submit a Facebook Page deletion request.
Before the user permanently removes a Page, it is essential to understand the consequences. Because deleting a Page can affect your followers, posts, photos, reviews, messages, and business information.
So through this blog we will walk you through the difference between deleting a Facebook Page, deactivating it, and unpublishing it, so you can choose the option which best fits your needs.
Whether the user is closing a business, removing an old community Page, or cleaning up your social media presence, this blog will walk you through clear, up-to-date instructions and practical tips that help them to complete the deletion process confidently.
By the end of this blog, you will know exactly how to delete a Facebook Page permanently, avoid common mistakes, and ensure that your crucial data is backed up before making your final decision.
Also Read: How to Write a Review on Facebook
Can You Delete a Facebook Page?
Yes, Facebook allows authorized users to permanently delete a Facebook Page. But, not every user who helps to manage a Page has permission to delete a Facebook Page.
For deleting a Page, you must have Facebook access with Full Control. Users that have limited permissions like task access, editor, moderator, advertiser, or analyst roles, they won’t see the option to delete the Page.
Before proceeding, it is essential for users to know what happens after they request on Facebook to delete a Page. Facebook provides a recovery period of 14 days that allows them to retrieve back the page before the Page get permanently removed.
Key points to know:
- You must have Full Control of the Facebook Page to delete it.
- Users with limited access cannot permanently remove a Page.
- Once the delete request is submitted then that page becomes hidden from the public.
- Facebook provides a 14-day recovery period during which the users can cancel the deletion of the page.
- If you do not restore the Page within 14 days, then Facebook will permanently delete the Page along with most of its content, such as posts, photos, videos, and other Page content.
Also Read: Best Social Media Management Tools for Businesses
Should You Delete Your Facebook Page?
For users deleting a Facebook Page is an important decision as once the 14-day recovery period ends, then the Page and most of its content are permanently removed.
Before deleting a page, they must consider whether they actually no longer need the Page. But if the user wants to use them again in the future, then just deactivating or unpublishing it can be a better option, as it allows you to restore the Page without losing their content or followers.
You should consider permanently deleting your Facebook Page if any of the following situations apply:
- Your business has permanently closed.
- You accidentally created the wrong Facebook Page.
- You’re merging your brand with another business or Page.
- Your Page contains outdated or irrelevant information that you no longer want to maintain.
- You have duplicate Pages that could confuse customers.
- You no longer use Facebook as part of your business or marketing strategy.
But if the user just wants to take a temporary break then it is usually better for users to either deactivate or unpublish their Facebook Page instead of deleting it permanently.
These options hide your Page from the public while preserving your posts, followers, and business information for future use.
Also Read: Why Customer Reviews are Important for Business Growth
Before You Delete Your Facebook Page
Before the user requests to delete a Facebook Page, they must take a few minutes to prepare. Complete a few important steps before you can help you avoid losing valuable information, which will disrupt customer communication, or affect your marketing efforts.
1. Download Your Page Information
Your Facebook Page may contain important content such as photos, videos, posts, customer reviews, messages, events, and business details.
And once the Page is permanently deleted, then recovering this data is extremely difficult or even impossible. So users are advised to download a copy of your Page data that ensures that you have a backup for future reference.
2. Inform Team Members
If there are multiple administrators or employees who manage your Facebook Page, then every administrator or employee must be informed before deleting it.
This helps to avoid confusion, prevents any interruptions to ongoing marketing campaigns, and ensures that everyone is aware that the Page will no longer be available.
3. Update Your Website
Check whether your website, blog, or online directory links to your Facebook Page. Remove or replace these links before Facebook Page deletion to prevent visitors from encountering broken links, that can negatively affect their experience and your brand’s credibility.
4. Notify Your Customers
If users regularly contact your business through Facebook, then inform them in advance. Users can either share a final post, update your website, send an email, or direct customers to another communication channel such as a website, send an email, or direct customers to another communication channels such as website, Instagram, or WhatsApp.
5. Review Active Advertising Campaigns
If your Facebook Page is linked to active advertising campaigns, then pause or end them before requesting deletion of a page. Because deleting a Page without reviewing active ads may interrupt campaigns, affect performance tracking, and result in unexpected problems with your marketing activities.
Also Read: Brand Reputation Management Software
Who Can Delete a Facebook Page?
Not everyone who helps manage a Facebook Page has permission to delete it. Facebook restricts this action to users with the highest level of access to protect Pages from accidental or unauthorised deletion.
Before attempting to remove a Page, make sure your account has the necessary permissions.
Users who can delete a Facebook Page include:
- The Page owner who created or manages the Page with full administrative rights.
- A user with Facebook access and Full Control, that allows them to manage all aspects of the Page, which includes deleting it permanently.
Users with the following roles cannot delete a Facebook Page:
- Task access
- Moderator access
- Advertiser access
- Analyst access
- Any other limited Page role
If you cannot find the Delete Page option in your setting, the most crucial reason is that your account does not have Full Control. In this case, ask the Page owner or another administrator with the required permissions to grant you Full Control before attempting to delete the page.
Also Read: How to Manage Online Reviews for Your Business
Delete vs Deactivate vs Unpublish a Facebook Page
Many users think that deleting, deactivating, and unpublishing a Facebook Page has the same impact, but each option has a different purpose.
Selecting the right option will depend on whether they want to permanently remove their Page or simply hide it for a period of time.
Understanding these differences can help you avoid losing valuable content, followers, and business information.
Delete
If the user deletes a Facebook Page then it permanently removes the page after a 14-day recovery period of Facebook. During the recovery period, the user can cancel the deletion if they change their mind. This option is best if you are sure that you no longer need the Page.
Deactivate
Deactivating a Facebook Page on a temporary basis hides your Page from the public without deleting its content. You can reactivate it at any time while keeping your followers, posts, photos, videos, and Page settings intact. It is a good option if you are redesigning your business, taking a temporary break, or rebranding your company.
Unpublish
Unpublishing makes your Facebook Page invisible to the public but still allows administrators to continue managing it. This option is useful when you need to make updates before making the Page visible again. Businesses can unpublish Pages when updating their brand, changing business information, launching a new product or service, or preparing marketing campaigns or promotions.
Also Read: Customer Sentiment Platform Vs Traditional Surveys
How to Delete a Facebook Page on Desktop
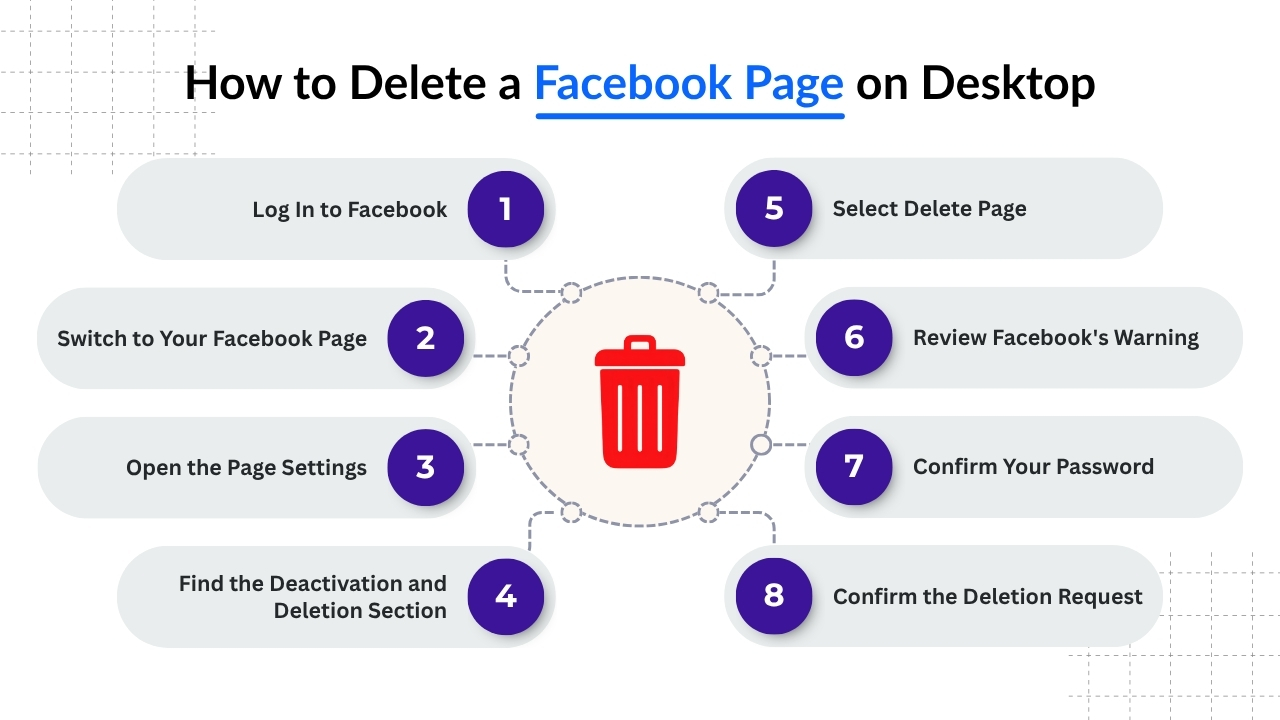
Users who want to delete a Facebook page on desktop, then Facebook allows you to delete a Page from the Settings menu.
Before you start, ensure that you are already signed in with an account that has Facebook access with full control, as users with less permissions cannot permanently remove a Page.
Follow these steps carefully to complete the deletion process.
Step 1: Log In to Facebook
The user will open a web browser and visit Facebook. Then the user may sign in with the Facebook account that has full control of the Page that they want to delete.
And if you manage multiple Facebook accounts, then verify that you are using the correct account before proceeding.
Step 2: Switch to Your Facebook Page
Then the user may click on the Profile picture which is present in the top-right corner of Facebook. While if you manage multiple profiles or Pages, select See all profiles and choose the Facebook Page that you want to delete. The user must ensure that they have switched to the accurate Page profile before making any changes.
Step 3: Open the Page Settings
After switching to the right Page, click on Settings. And based on Facebook’s latest interface, you may need to open Privacy, Facebook Page Information, or Access and Control.
Facebook occasionally updates its menus, so the exact words may differ, but the deletion option is located within these settings.
Step 4: Find the Deactivation and Deletion Section
Scroll through the settings menu until you find Deactivation and Deletion. Click this access Facebook’s Page removal tools. Here, Facebook lets you choose whether you want to deactivate the Page temporarily or delete it permanently.
Step 5: Select Delete Page
You will see two options:
- Deactivate Page – Temporarily hides the Page while keeping all your content and followers.
- Delete Page – Permanently removes the Page after Facebook’s recovery period.
Choose the Delete Page, and then click Continue to move to the next step.
Step 6: Review Facebook’s Warning
Before confirming your decisions, Facebook shows a crucial warning explaining what will happen after you submit the deletion request.
Read the information carefully. Key points include:
- Your Page will immediately become unavailable to the public.
- You have 14 days to cancel the deletion if you change your mind.
- After the recovery period ends, the Page and most of its content will be permanently deleted.
Step 7: Confirm Your Password
To protect your account from unauthorized actions, Facebook may ask you to verify your identity. Enter your Facebook account password and click Continue.
In some cases, you may also be asked to complete an additional security verification.
Step 8: Confirm the Deletion Request
Finally, click the Delete Page to submit your request. Facebook will immediately hide your Page from public view while the deletion process starts.
During the 14-day recovery period, you can still restore the Page if you change your mind. If no action is taken within that time, Facebook permanently deletes the Page along with most of its posts, photos, videos, and other associated content.
What Happens Immediately After Deleting?
Once you submit a request to delete your Facebook Page, the page is immediately hidden from public view. It means customers, followers, and other Facebook users can no longer access or interact with it.
However, the Page is not permanently deleted right away. Because Facebook provides a 14-day recovery period, and thereby giving you time to restore the page if you change your mind.
During this recovery period:
- Your Facebook Page is hidden from all users.
- Followers and visitors cannot view or interact with the Page.
- The Page no longer appears in Facebook search results.
- Existing links to the Page may stop working or display an error.
- Administrators with Full Control can still cancel the deletion request.
Consider a 14-day recovery period as a safety window. If you decide to keep your Page, then you can restore it before Facebook permanently deletes the Page and its associated content.
Also Read: Social Media Management Tips for Small Businesses
Can You Recover a Deleted Facebook Page?
Yes, you can recover a deleted Facebook Page, but only during Facebook’s 14-day recovery period. When you request deletion, Facebook does not permanently remove the Page immediately.
Rather it temporarily hides the Page and gives you two weeks to change your mind. During this period, all your Page content, followers, and settings remain intact, which allows you to restore the Page if needed.
If you decide to recover your Facebook Page, follow these simple steps:
- Log in to the Facebook account that has Full Control of the Page.
- Switch to the Facebook Page you requested to delete.
- Open the Settings menu for the Page.
- Locate the deletion notification or the Deactivation and Deletion section.
- Click or tap Cancel Deletion.
- Confirm your choice to restore the Page.
Once you complete these steps, your Facebook Page will become active again, along with its posts, photos, videos, followers, and other Page information.
Keep in mind that after the 14-day recovery period expires, Facebook permanently deletes the Page. In most cases, it cannot be recovered, so make sure you’re certain before allowing the deletion period to end.
Also Read: How AI Can Analyze Customer Feedback
How to Delete a Facebook Page on the Facebook Mobile App
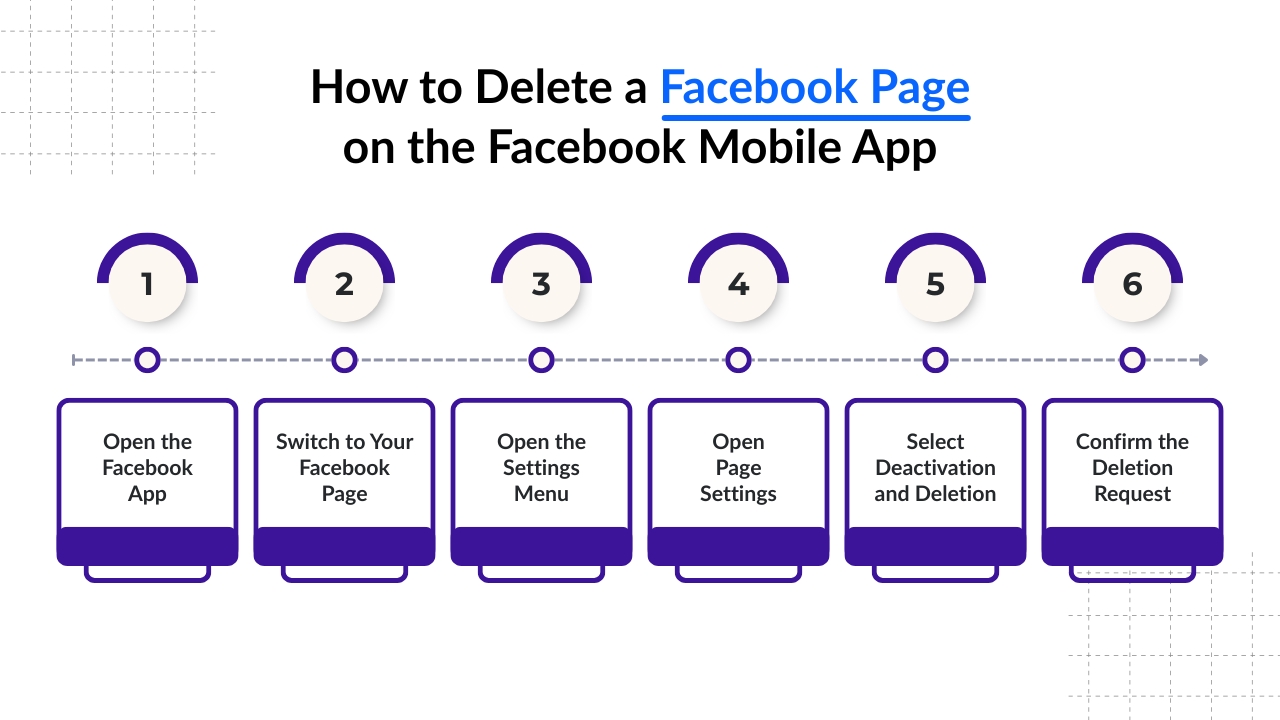
Most people manage their Facebook Pages using the Facebook mobile app, which makes it convenient to update settings or delete a Page from anywhere.
Although Facebook occasionally changes the layout of its app, the overall process remains similar. Before you start, make sure you are signed in with an account that has Facebook access with Full Control, as users with limited permissions cannot permanently delete a Page.
Step 1: Open the Facebook App
First, launch the Facebook app on your Android device. Sign in by using the Facebook account that has full control of the Page you want to delete. If you are already logged in, then verify that you are using the correct account before proceeding.
Step 2: Switch to Your Facebook Page
Tap your profile in the Facebook app. Select see all profiles if you manage multiple profiles or Pages. Choose the Facebook Page you want to permanently delete. Double-check that you’ve selected the correct Page before continuing.
Step 3: Open the Settings Menu
Tap the Menu icon. Scroll down and select Settings & Privacy. Tap Settings to open your account and Page management options. Depending on your app version, the menu layout may look slightly different.
Step 4: Open Page Settings
Locate the Page management section. Look for options such as Access and Control, Page Settings, Your Information, Facebook Page Information. Facebook regularly updates its interface, so the exact wording may vary, but the deletion option is usually found within these settings.
Step 5: Select Deactivation and Deletion
Go to the Deactivation and Deletion section in your Page settings. Facebook will show two options for Deactivation and Deletion. While Deactivation Page temporarily hides your Page while still preserving its content and followers.
While the Delete Page option permanently removes the Page after the recovery period. Choose Delete Page, and then tap Continue to proceed with the deletion request.
Step 6: Confirm the Deletion Request
Facebook may ask users to verify your identity by entering your account password and completing an additional security check. Once the password is verified, click on the Delete Page to submit your Deletion request.
Your Facebook Page will be immediately hidden from public view and enters a 14-day recovery period of Facebook. During this time, users can cancel the deletion if they change their mind before it gets permanently removed.
Also Read: Best Social Media Management Tools for NonProfits
How to Delete a Facebook Business Page Using Meta Business Suite
If you manage your business page through Meta Business Suite, then you can delete your Facebook Business Page directly from the platform.
Through Meta Business Suite businesses can manage Facebook and Instagram accounts, schedule their posts, track messages, and access Page settings from a single place.
Before requesting deletion of a page on Facebook, ensure that as a user you have Facebook access with full control, as only users with the appropriate permissions can permanently remove a Business Page.
Step 1: Open Meta Business Suite
First, visit the Meta Business suite website and open the Facebook mobile app on your device. Then the user must sign by using the Facebook account that manages your business and has full control of the Facebook Business Page that the user wants to delete.
And if the user manages multiple business accounts or Pages, then they can verify that they have selected the correct business profile before proceeding.
Step 2: Select the Correct Business Account
Then the user must sign in to Meta Business Suite where they will see a list of businesses connected to your account. Choose the business that owns the Facebook Business Page which they want to delete.
And if the user manages multiple brands or companies, carefully verify that you have chosen the accurate business account to avoid deleting the wrong Facebook Page.
Step 3: Choose the Facebook Page
Then the user must navigate to the list of Facebook Pages of this business account. Choose the specific Facebook Business Page that you want to remove.
Check thoroughly the Page name, logo, and business details before continuing, especially if you manage multiple Pages.
Step 4: Open Settings
Go to the left-hand navigation menu and click Settings. This section contains the management tools for your Facebook Business Page, which includes permissions, business information, and Page control.
Based on the updates made to Meta Business Suite, the layout may differ slightly, but the settings menu is where you will find the deletion options.
Step 5: Navigate to Page Settings
From the Settings menu, open Page Settings. Then review your page information and confirm that you are managing the accurate Page. And if the user cannot access Page Settings, then check whether their account has the required permissions.
Step 6: Select Access and Control
Click on Access and Control to view options for managing, deactivating, or deleting the Page. This section also allows authorized users to control Page ownership, and administrative permissions. And if the option is not available then your account may not have full control.
Step 7: Choose Deactivation and Deletion
Open the Deactivation and Deletion section from the available Page settings. Facebook will provide two options to the user, which is to Deactivate Page and to Delete Page.
If the user Deactivate Page, then on a temporary page get hidden while keeping all content and followers. And if the user Delete Page, then the platform permanently removes the page after a 14-day recovery period.
If you are sure you no longer need the Page, then the user can select the Delete Page option and continue with the Deletion of the page.
Step 8: Confirm the Deletion Request
If the user has already decided to Delete Page then they must carefully review Facebook’s confirmation message before proceeding with the delete page option.
Facebook will inform users that the Page will immediately become unavailable to the public and can only be restored during the 14-day recovery period. The user must confirm their decision to submit the deletion request.
If the user changes their mind within 14 days, you can cancel the deletion and restore the Page. After the recovery period ends, Facebook permanently deletes the Page and most of its posts, photos, videos, and other content.
Conclusion
Knowing how to delete a Facebook Page permanently helps users to manage their online presence confidently. Whether users want to close a business, remove a duplicate Page, or no longer use Facebook for marketing, following the right steps ensures that the process is completed safely and without any much difficulty.
Before submitting a deletion request, the user must remember and download crucial Page data, notify team members, and customers if necessary, and review any active advertising campaigns or connected services.
It is also essential to understand that deleting a Facebook Page is different than deactivating or unpublishing it. If the user is unsure whether they want to permanently remove their Page, consider these alternative options, as they allow you to hide your Page while preserving your content and followers.
Once you request deletion, Facebook provides a 14-day recovery period, giving you time to restore the Page if you change your mind.
By following this step-by-step in this blog, you can avoid common mistakes, protect valuable data, and make the best decision for your personal or business needs.
Whether you choose to delete, deactivate, or unpublish your Facebook Page, understanding each option ensures you maintain full control over your digital presence.
If you still have any query about how to delete a Facebook Page permanently then you may write to us at Clariv and we are more than happy to assist you.